Introduction#
Animation is a key aspect of making games—after all, making a game is, in part, about making images move in response to user inputs or internal game logic. In this lesson, we will explore how to create and control animations in Godot 4 using the AnimationPlayer node and scripting. By the end, you will have a solid grasp of how to animate a character’s idle and movement states, and how to control these animations dynamically via code.
Animation Player#
The AnimationPlayer node in Godot allows you to create, edit, and control animations for any node property over time (e.g., position, rotation, scale, sprite frame index, etc.). In this lesson, we’ll start by adding simple idle and movement animations to a character, and then we’ll learn how to trigger them with code.
Controlling Node Properties with Animation Player#
Let’s begin by controlling the animation strictly through AnimationPlayer—no code yet. This will help you understand how keyframes and animation tracks work in Godot.
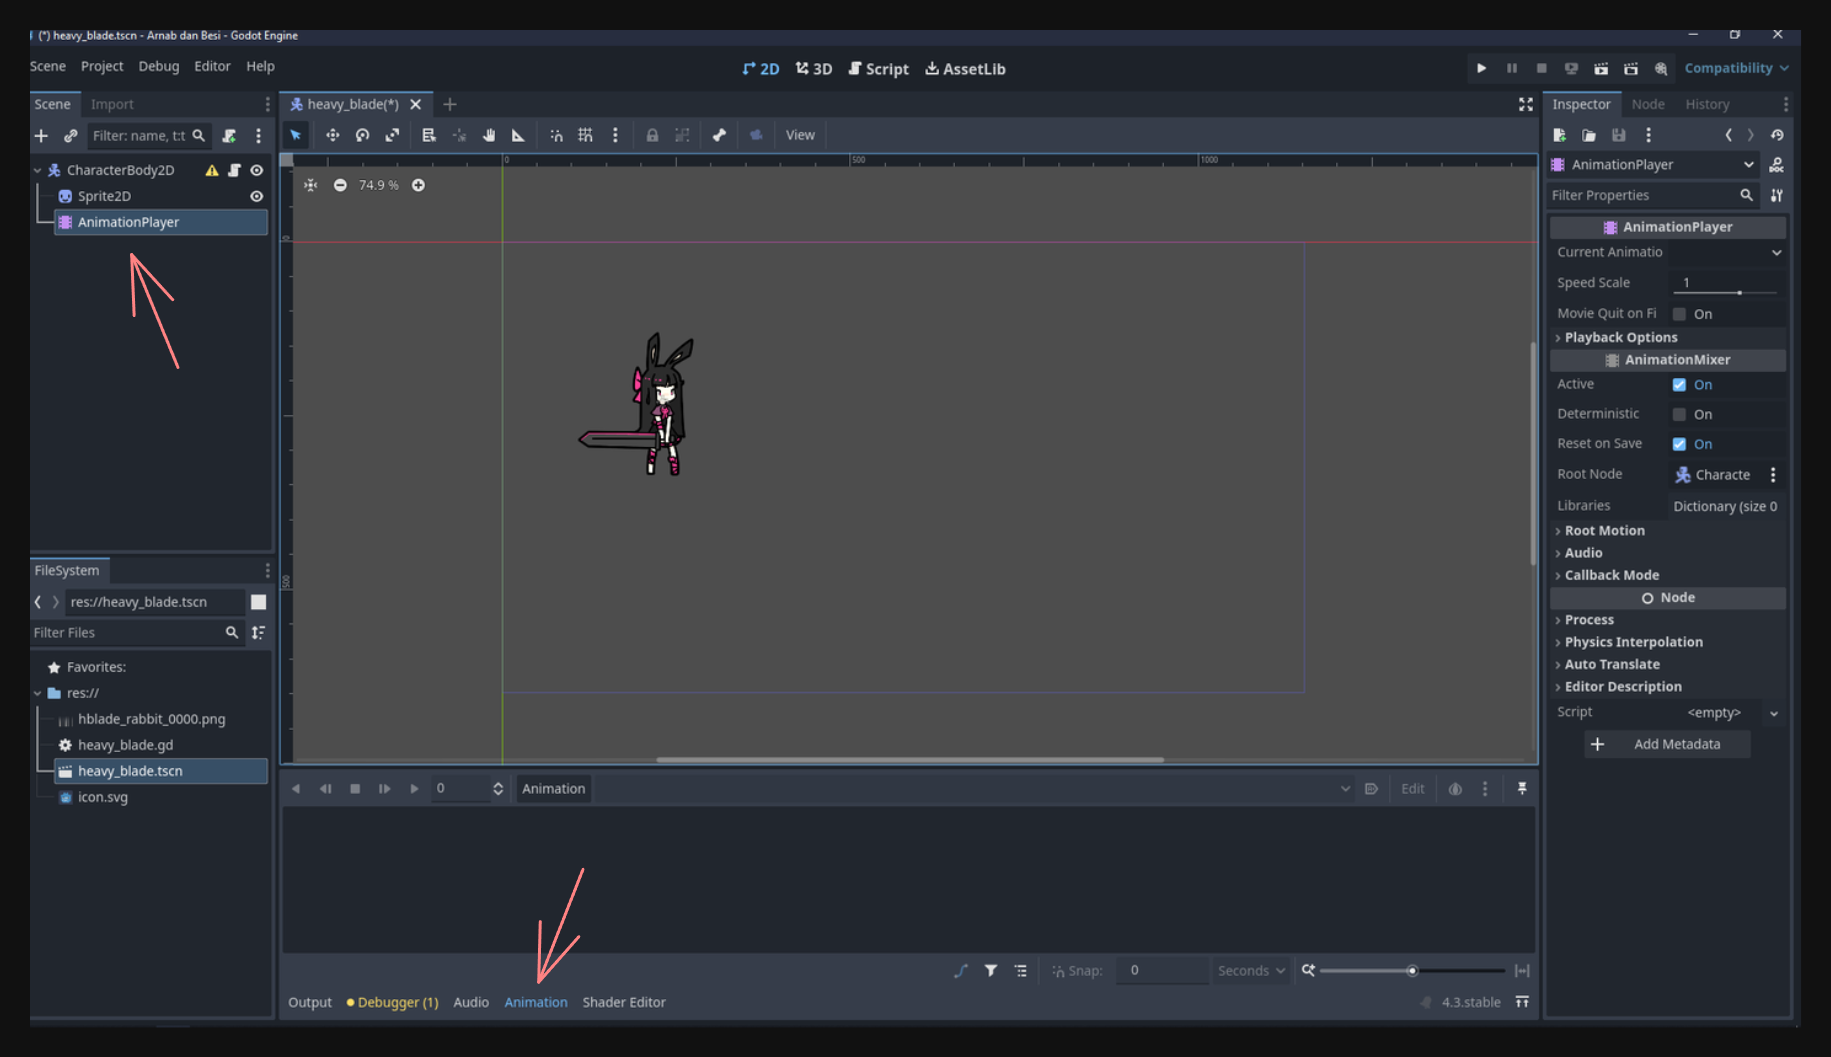
1. Adding Animation Player to the Character Scene#
- In your Scene panel (usually on the left in the Godot editor), search for AnimationPlayer and add it as a child of your character scene.
- Select the AnimationPlayer node; you should notice a new tab labeled Animation at the bottom panel of the editor. This is the animation panel where you’ll manage and preview all your animations.
2. Creating a New Animation#
- In the animation panel, click New Animation.
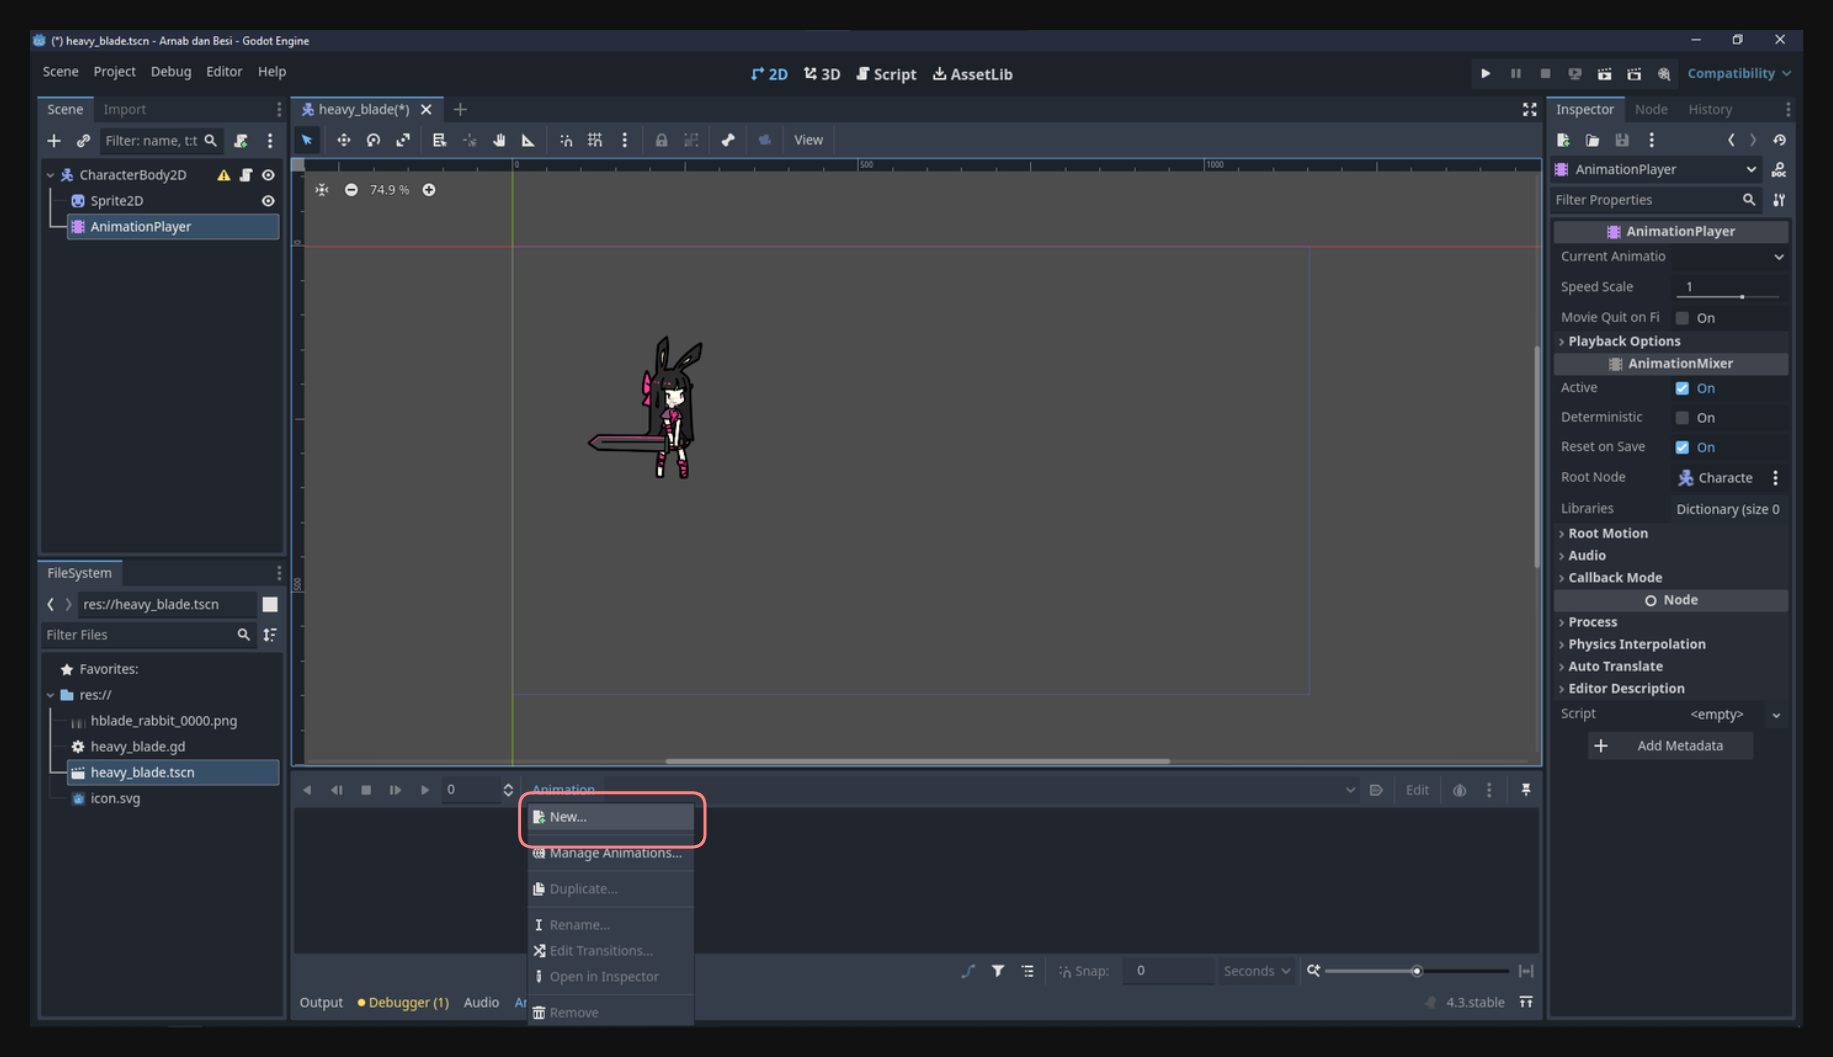
- Name this animation idle, since it will represent your character’s idle state.
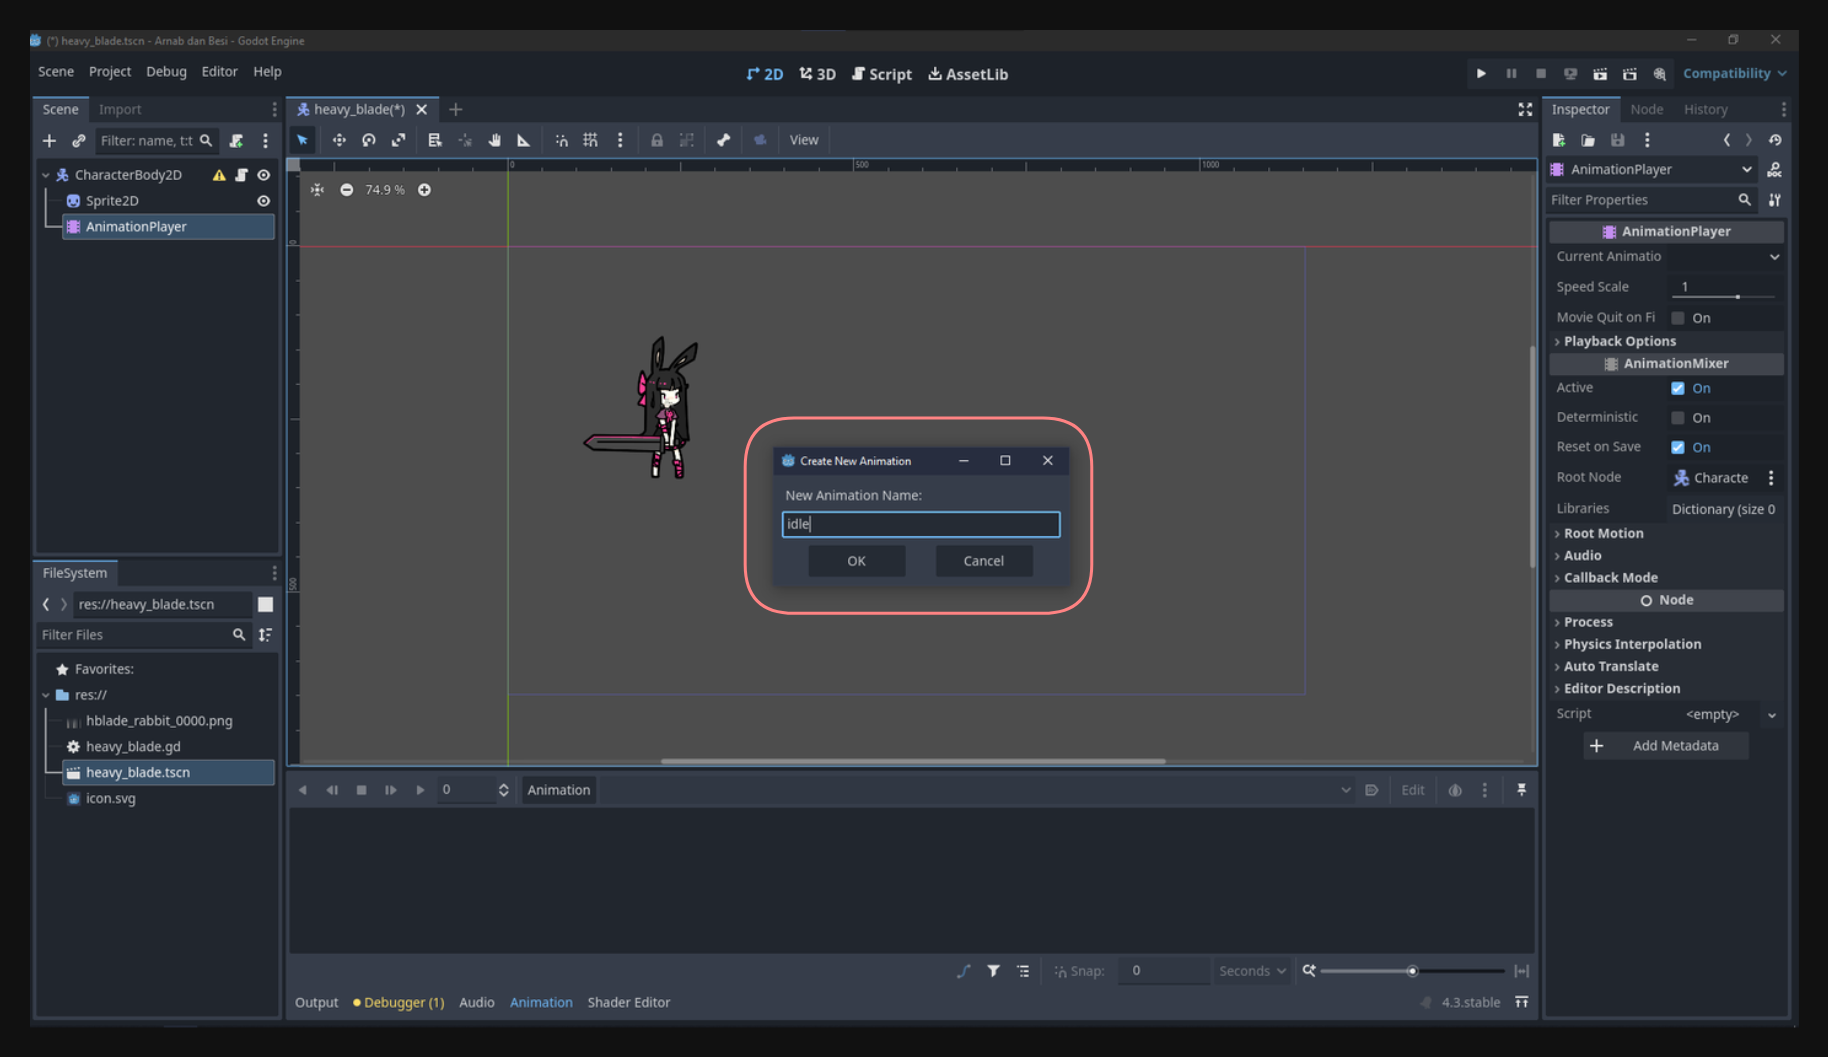
Godot will now create an empty timeline for your new animation, and you can begin adding tracks/keyframes to define how properties change over time.
3. Inserting a Node’s Property into the Animation Track#
- Make sure the AnimationPlayer is still selected and the idle animation is open in the animation panel.
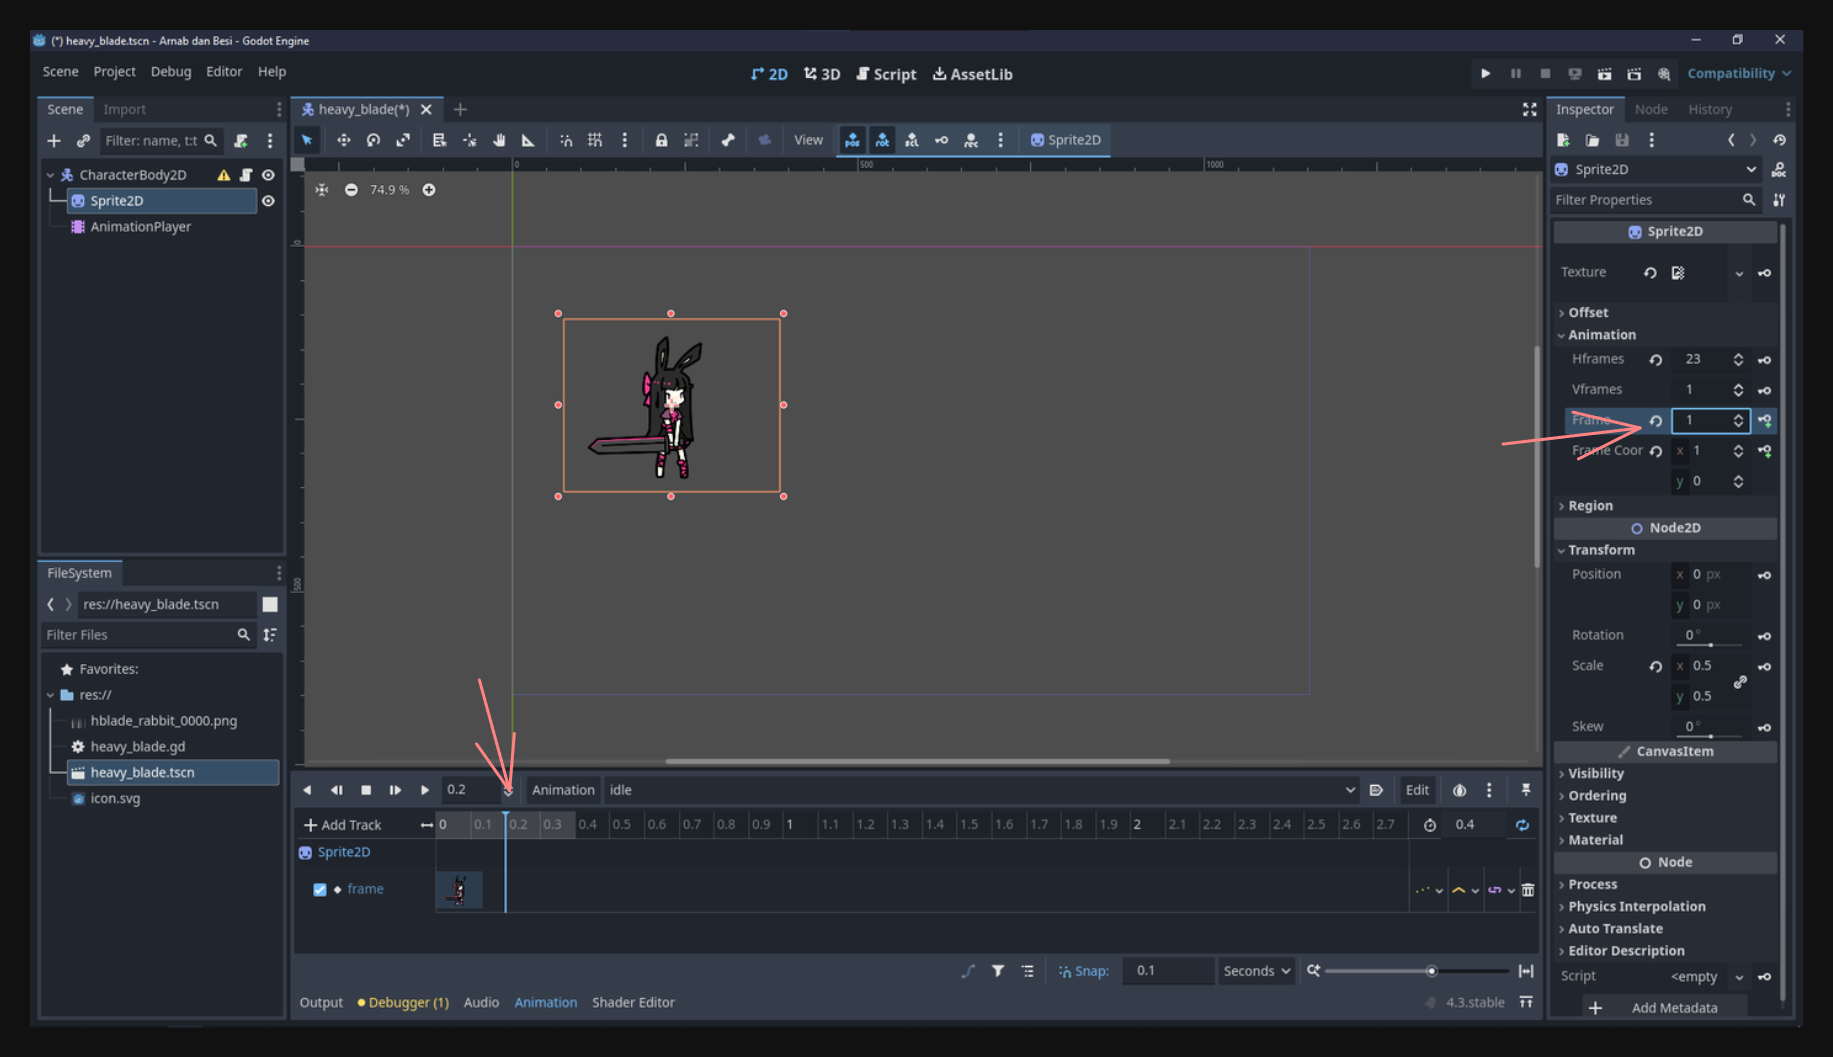
- Select the node you want to animate—in this case, possibly a Sprite2D that shows your character’s frames.
- In the Inspector, find the property you want to animate (We’ll use the frame property).
- Check from what frame to what frame the animation is.
Click the key icon beside that property to insert a key at the current timeline position. Then click create when prompted.
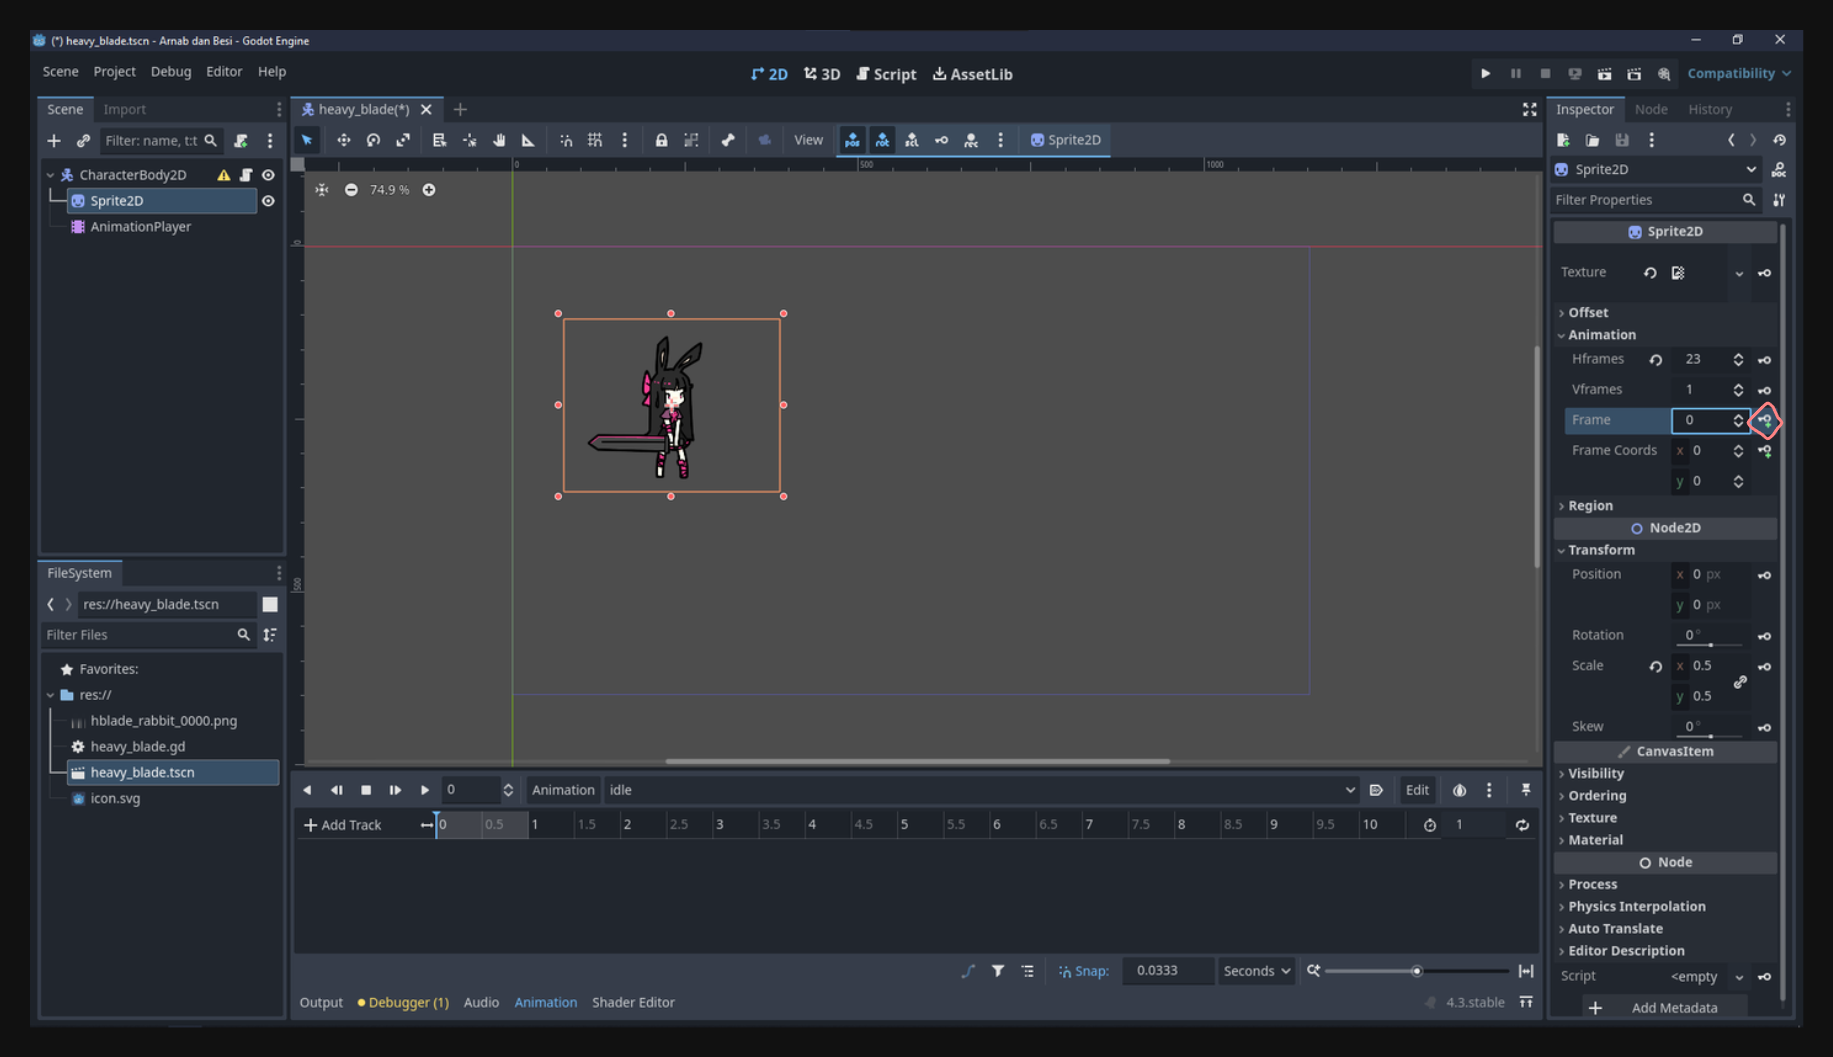
Since we’ll be working with pixel art, adjust the snapping to a small value so it’s easier to control the animation, I’m using 0.1.
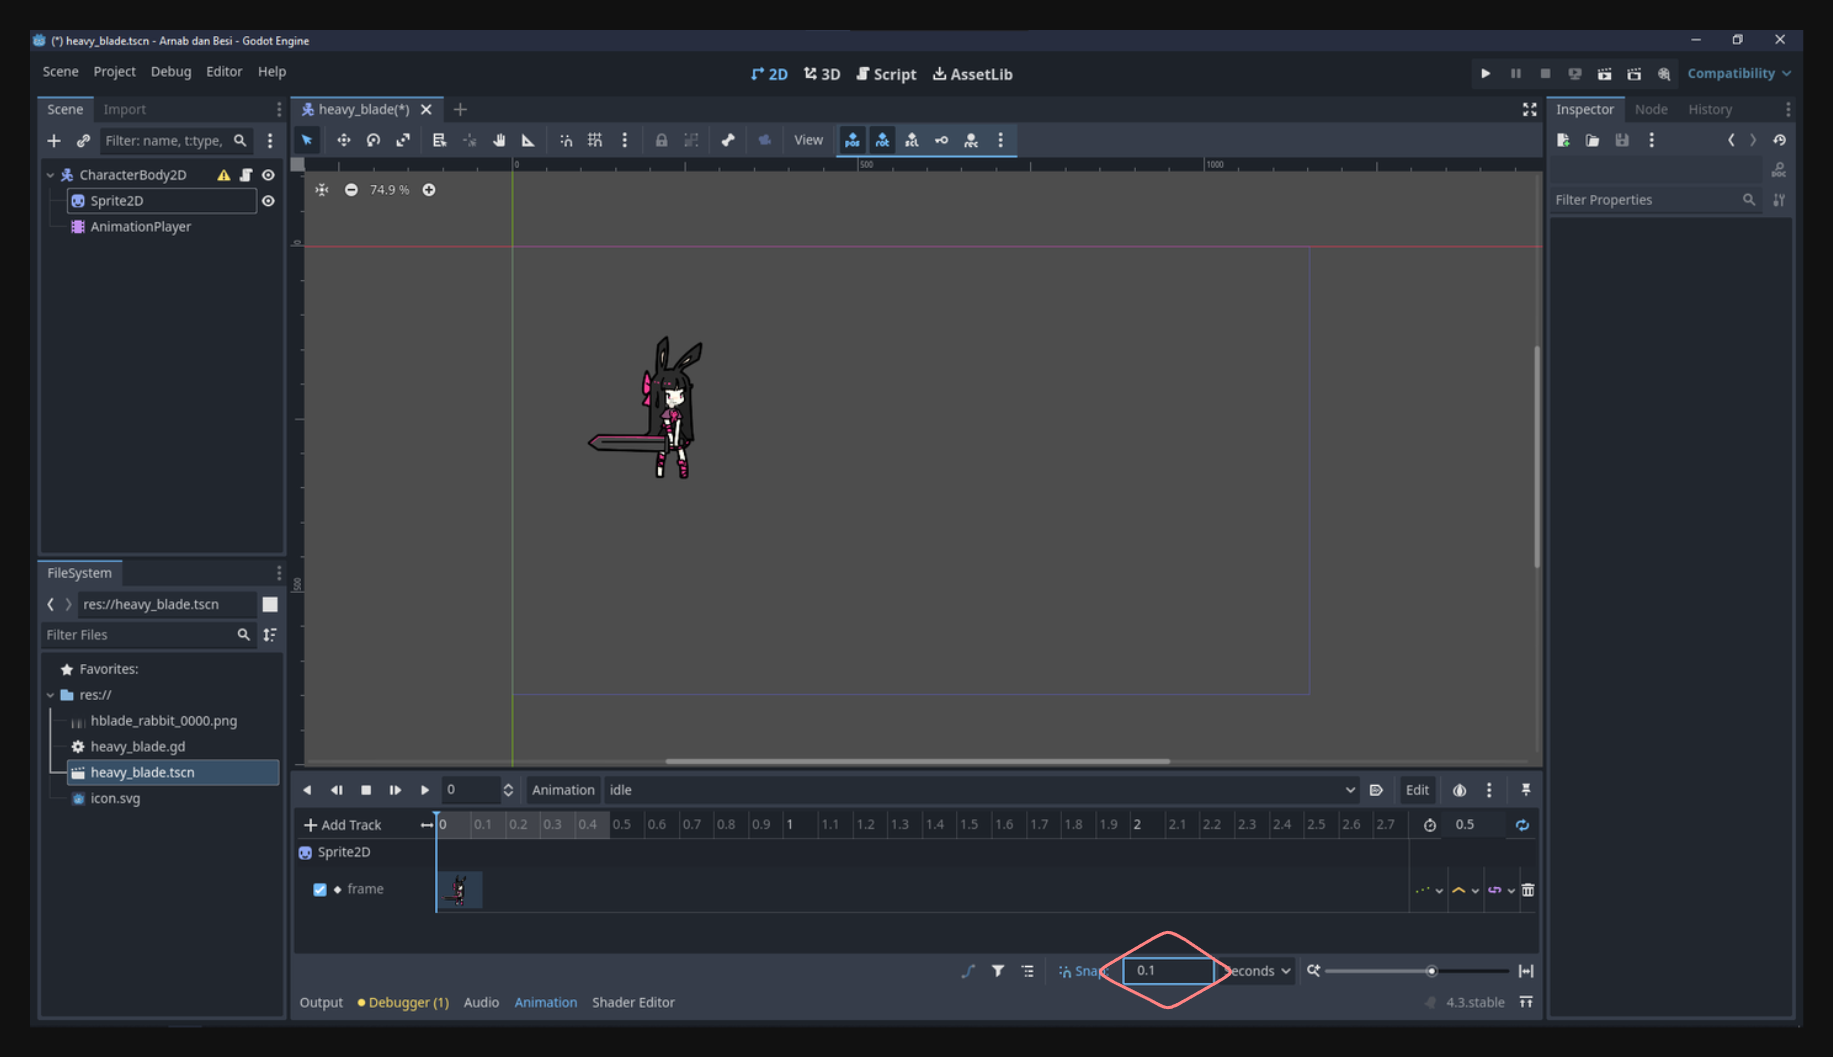
Also adjust the animation length of the animation, I’m using 0.4 seconds.
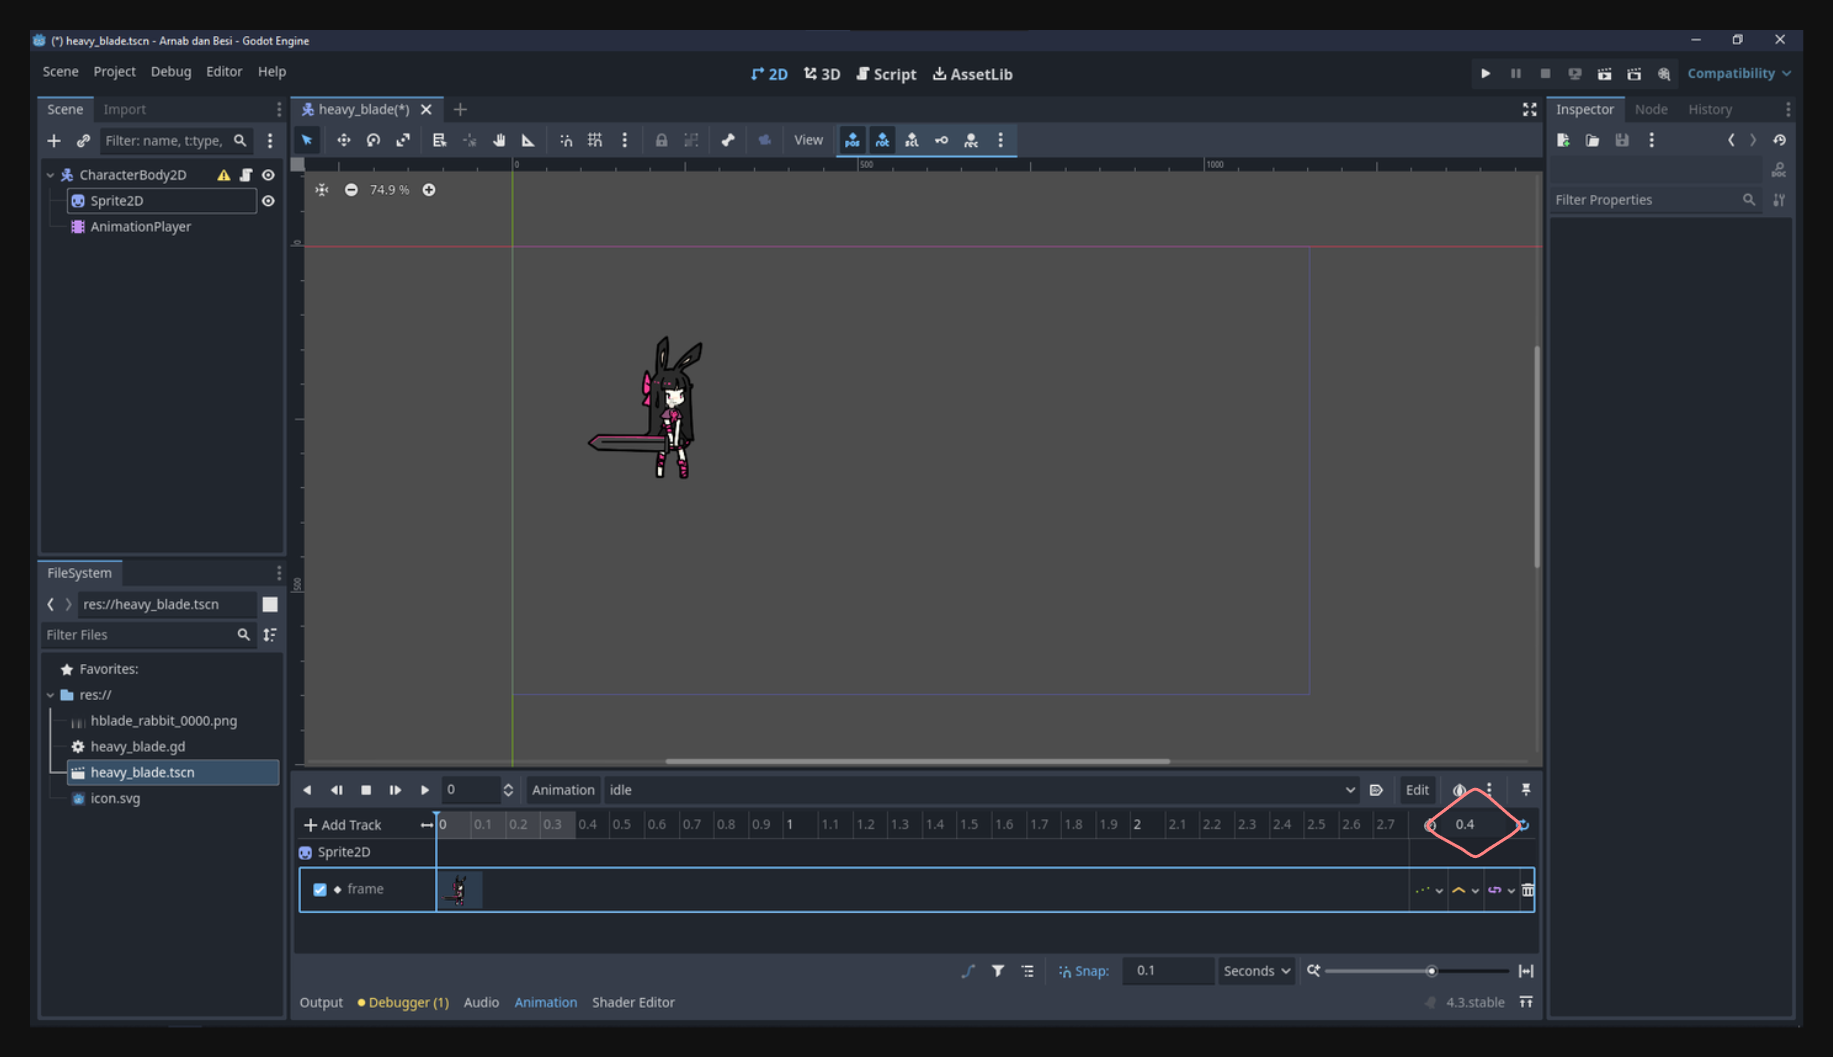
Drag the timeline and add another keyframe, I’ll add the second keyframe at 0.2 seconds.
You can experiment with the timeline position to control the speed of switching between frames. The closer the keyframes are, the faster the animation will be.
4. Playing the Animation#
To see your animation in action:
- Click the Play button in the animation panel.
- Observe the sprite changing frames according to the keyframes you set.
- Adjust keyframes (timing, frame numbers, etc.) to get the desired effect, and preview again.
5. Making It Loop#
Since this idle animation should repeat indefinitely:
- In the animation panel, click the Loop button (often represented by a circular arrow).
- Make sure “Loop” is checked in the animation’s properties so it never stops playing.
6. Setting a Default Animation#
To make the idle animation play automatically when the scene is loaded:
- Click the Default button in the animation panel.
- This tells Godot to play idle by default when the scene starts.
Play the scene and see the idle animation playing.
Creating Movement Animations#
Next, we’ll create two new animations: move_left and move_right. These will be triggered when the player moves the character left or right, respectively.
1. Creating the Animations#
Repeat the same process:
- In the animation panel, create a new animation and name it move_left.
- Create another new animation and name it move_right.
At this point, you have three animations in your AnimationPlayer: idle, move_left, and move_right.
I trust you can do the rest of the steps by yourself.
Controlling Animation with Code#
While controlling animations manually in the AnimationPlayer is good for fixed or non-interactive scenarios, you’ll often want to decide which animation to play based on game logic (e.g., player input, velocity, or AI states). This is where GDScript comes in.
Determining Movement Direction#
We want to play the move_left animation when the character is moving left, and the move_right animation when the character is moving right. If the character is not moving at all, we play idle.
how do we detect this in code? There are two common ways to determine movement direction: checking player input or checking the character’s velocity
- Check Input Actions: If
Input.is_action_pressed("move_left")is true, then play “move_left.” Same for “move_right.” - Check Velocity: Use the character’s velocity (e.g.,
velocity.x) to determine whether it’s moving left or right.
A more robust method is to rely on velocity, since it accounts for all possible influences (player input, physics, etc.) and only plays movement animations when the character is actually moving.
Updating Movement Code Logic#
In Godot 4, the CharacterBody2D node provides built-in movement methods (e.g., move_and_slide()) and a velocity property. Typically, you might calculate velocity from user input and apply it to the character with each frame.
Updated character script:
extends CharacterBody2D

func _process(delta: float) -> void:
    var direction = Vector2.ZERO

    if Input.is_action_pressed("move_left"):
        direction.x = -5
    if Input.is_action_pressed("move_right"):
        direction.x = 5
    if Input.is_action_pressed("move_up"):
        direction.y = -5
    if Input.is_action_pressed("move_down"):
        direction.y = 5

    velocity = direction

    move_and_slide()
directionrepresents the desired direction based on the player’s input.move_and_slide()actually moves the character based on the velocity.
Now we have a velocity. We can detect whether velocity.x is negative (moving left), positive (moving right), or zero (not moving horizontally).
If the character is moving too slow, you can increase the value 5 to a higher number. I’ll use 200.
Getting a Reference to the Animation Player in Code#
To switch animations via code, you need to reference the AnimationPlayer node. For example, if your scene’s structure is:
CharacterBody2D
|- Sprite2D
|- AnimationPlayer
You can get the AnimationPlayer with:
var animation_player = get_node("AnimationPlayer")
Controlling Animation with Logic#
Finally, we combine the movement logic (velocity) with animation control.
Full Script:
extends CharacterBody2D

var animation_player

func _ready():
    # Assign the AnimationPlayer node to the animation_player variable when the scene is ready
    animation_player = get_node("AnimationPlayer")

func _process(delta: float) -> void:
    var direction = Vector2.ZERO

    if Input.is_action_pressed("move_left"):
        direction.x = -200
    if Input.is_action_pressed("move_right"):
        direction.x = 200
    if Input.is_action_pressed("move_up"):
        direction.y = -200
    if Input.is_action_pressed("move_down"):
        direction.y = 200

    velocity = direction

    move_and_slide()

    if velocity.x > 0:
        animation_player.play("move_right")
    elif velocity.x < 0:
        animation_player.play("move_left")
    elif velocity.y != 0:
        animation_player.play("move_right")
    else:
        animation_player.play("idle")
- When
velocity.xis greater than 0, the character is moving right, so we callplay("move_right"). - When
velocity.xis less than 0, the character is moving left, so we callplay("move_left"). - When
velocity.yis not 0, the character is moving up or down, so we also callplay("move_right"). - If
velocity.xis 0, we revert to the idle animation.
This code ensures the correct animation is always playing based on your character’s horizontal movement.
Play the scene and see the character moving.
Conclusion#
By understanding both the AnimationPlayer node’s timeline/keyframe approach and how to trigger animations through GDScript, you unlock a powerful way to make your characters (and other objects) come to life. You can now:
- Create and edit animations visually in the Godot editor.
- Loop or set default animations for basic states like idling or walking.
- Write scripts that switch animations dynamically based on movement, input, velocity, or any other in-game variables.
This foundation will carry you through more advanced animation features such as blending, animation trees, and state machines. But for now, you have the essentials of how to control animations in Godot 4.
If you encounter any issues, feel free to ask in the Discord server.
I’ll see you in the next lesson!